Dispatching a call out of Tracker is a rather simple matter once everything is setup, i.e. all applicable drivers, and accounts are in the system and ready to go. Please seek our Adding a New Account, and our Adding a New Employee guides for further details.
One more note before we continue, if your company is utilizing our TrackerMobile product for mobile dispatching, ensure that the driver is logged into the application before proceeding.
The Dispatch Screen
Step one is to log into Tracker and select the orange Dispatch icon. This will open the Dispatching screen.

From this menu, we have many options to select, so let's break down the general areas that we are seeing. The primary, and largest, section is where all of your calls/dispatches/runs will appear. These calls can be sorted by selecting any of the column headers at the top of this area. Take note of the up and down arrows to the right of this area, these can be used to scroll. The smaller, right hand, section shows all of your active drivers that you can assign calls to. Take note that the drivers that are highlighted in green are currently logged into TrackerMobile.
From this menu, we have many options to select, so let's break down the general areas that we are seeing. The primary, and largest, section is where all of your calls/dispatches/runs will appear. These calls can be sorted by selecting any of the column headers at the top of this area. Take note of the up and down arrows to the right of this area, these can be used to scroll. The smaller, right hand, section shows all of your active drivers that you can assign calls to. Take note that the drivers that are highlighted in green are currently logged into TrackerMobile.
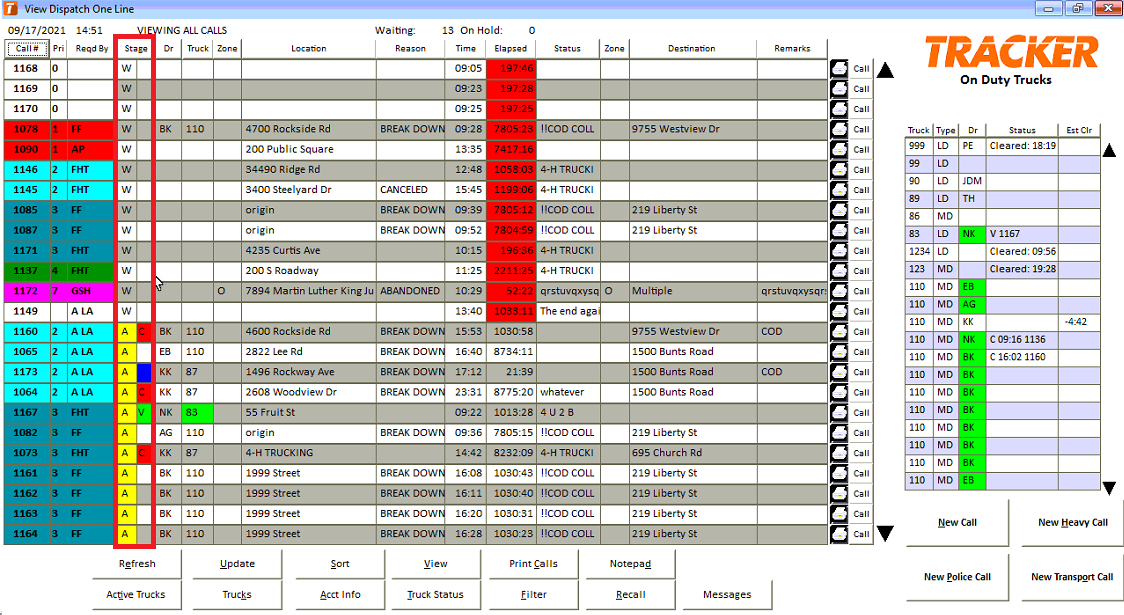
Under call list/section you will see a multitude of different buttons, starting with Refresh. We'll come back to these later; for now direct your attention to the four larger buttons on the right side, under the driver list. You can add a new call/dispatch/run from these four options. Click on the desired type of call you would like to add.
Dispatch Key
In the above picture of the dispatch board, you'll notice that I've highlighted the Stage column with a red box. This area is split into two columns, each of which with various letters and colors. If you would like more information regarding what information this space is telling you, take a look at the Dispatch guide titled The Dispatch Stage Key.
Adding a Call/Run/Dispatch
Adding a new call will open a window with various sections for call entry data. It looks intimidating, but it's rather straight forward. The screen is broken up into four sections: Call Information, the Tow Information, Vehicle Information, and Billing Information.

Tow Information: Where the information related to the actual job is located. The fields are self explanatory, but pay attention to the Multiple Destinations button. Selecting this will open a new window where you can enter in different locations if the job requires it.
Vehicle Information: Where all of the information applicable to the vehicle(s) involved in the job are located. Pay attention to the Multiple Vehicle button (If more than one vehicle is involved in a job) in the top right, the VIN check button (used to verify if a VIN is valid), and the key location (where the keys to the vehicle are located, if present). Keep in mind that all of this information is accessible, and editable after a call is dispatched.
Billing Information: Where all of the information related to the payment for the job is located. All calls require a Bill To account to be entered. This account does not need to be the same as the requested by. Note that directly under the Billing Information section is where call notes can be entered in, as well as the check box to show if this call is for Police Hold.
Example Call
Here is an example call with test information entered in. All fields highlighted in green are the Required Fields for this test account. These required fields can be setup from the Accounts list (located under Lists -> Accounts -> Account/Vendor -> Select the desired Account -> Required Fields.

Assigning the Call
Once the call information has been entered in, and it is time to assign the call, you can select the Save/Assign button in the bottom right of the call entry screen, or, if the call is to be assigned at a later time, you can just click the Save button and then click on the call # on the left-hand side of the dispatch screen. Doing either of these actions will bring up the call Assign/Update screen.

The Assign/Update screen is where dispatch times, charges, and mileage are kept track of while the call is active. It is important to note that these important areas (as well as everything else pertaining to the call) are transferred over to the invoice, which is located within Recall, once the call has been cleared out of Dispatch.
To assign or reassign a driver to a call, select the truck number, and the driver that is to be assigned to the call in question from their respective drop down lists, as seen from the highlighted fields in the above picture. Alternatively, a faster way to assign a driver to a call is to enter in their driver code (this is seen under Lists -> Employees -> Employees) into the Driver field and hit TAB on your keyboard. This will auto-populate the call with your intended driver and the truck that they are assigned to. Once assigned, click on the Send button (as seen in the red box).
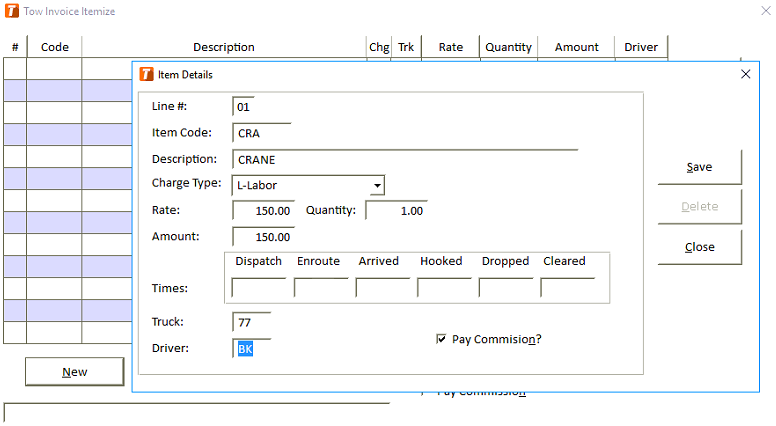
Assigning Multiple Drivers
If a call is to be assigned to multiple drivers (as well as multiple trucks and equipment) simultaneously, then instead you select the Itemize button on the right-hand side of the screen, as seen in the blue box. Once on the Itemize screen, select the New button and fill in the applicable data.