How Rates Work
Within the program, Rates serve as the means of calculating how the program will automatically fill in charge/line items for each individual Account. These Rates can be as broad or as specific as you desire. The better you understand this aspect of the program, the easier your job becomes.
Let's give some context through an example situation: You have a new account that your tow operation will be providing services for. Moving forward, this account will require several Rates set up for various Tow Types.
From the Tracker main menu, in the top left, select Lists -> Accounts -> Account Vendor. You add the new account (See our Adding a New Account guide) and direct your attention to the right-hand side. The only options that are concerned with Rates are Rates and Misc. Charge.

Click on the Rates button for now.
Welcome to the Accounts Rates window, and it looks rather intimidating at first glance but it's easy if we break it down. For now, click on the NEW option. Whenever you add on a new Rate for an account, be sure to click NEW first.
The first step is to determine what is the Tow Type for the Rate you are going to create. As long as you Determine a Tow Type then you can continue reading. For more details, please see our Adding a New Tow Type guide. In our example, I'm going to be creating a Light Duty or LD tow type rate.

In the top left, the blue box, we have Towing Charges. First, you must determine if the rate is a flat amount, or if it is charged by the hour. Notice how both sections have space to distinguish between a Day tow and a Night tow. Most tow operations charge an additional fee for tows at Night, if your tow operation does not then simply fill in the Night fields with the same amounts as the Day fields.
Now underneath the Hourly Day and Night Rate fields, you'll see a set of fields called: Day Hours From/To. This is where you will determine what Tracker will consider Days hours and Night hours. Anything in between these two fields will be considered what your Day hours are, and anything outside will be considered your Night hours. So for example, if we wanted to have our morning hours start at 7:00 AM and end at 9:00 PM, then we would enter in 0700 to 2100. Therefore anything outside of this range is now your Nightly rate.
Now above the Hourly Day/Night Rate fields you will see the Base Rate, and Included Minutes fields. These are used if your tow operation has an initial hookup/tow charge that occurs before the hourly starts. So if your operation charges an initial cost of, say, $100 for the first 30 minutes, this is where that information will be entered.
Next direction your attention to the Hourly Minimum field. The Hourly Min. is simply the minimum a tow of this type, can be charged for. This is especially useful for jobs that go under the hourly minimum in length. Keep in mind that you cannot have a Base Rate and an Hourly minimum at the same time, as these functions are very similar.
The Increment field is used to determine what percentage into the next hour Tracker will add on it's charges for. Keep in mind if no Increment is added, a job will only be charged once, every hour, on the hour. We can get around this by entering in a percentage amount into the Increment field. So if we enter in 0.5, every 30 minutes into the hour Tracker will add on 50% of the hourly rate onto the total. If we made the Increment 0.25, every 15 minutes will be charged.
Dispatch to Cleared, last but not least for the top left section, simply choose from what point in a job do charges begin and end. Most tow operations either choose to start from the Dispatch stage or the Enroute stage, and most end at the Cleared stage.
The top right, the green box, is the section where Tracker determines how Storage Rates are calculated for this tow type. Take note that storage can be split up between inside, and outside storage. If your tow operation does not have inside storage, then simply fill in just the outside storage section.
In either case, storage is broken down into three segments: First, Next, and Thereafter. It is easiest to understand with an example, see below.

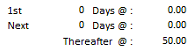
In this picture, I have filled in the corresponding fields with a staggering storage rate. It is read like this, the first day of storage is $40, then the next 6 days are $50. Everything afterword (after 7 days) is $60.
Now the cool thing about these storage fields is that you don't have to make anything staggered if you don't want to, see below.
Now the cool thing about these storage fields is that you don't have to make anything staggered if you don't want to, see below.
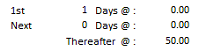
In this example, I just have $50 being charged every day. This is because Tracker reads these fields as: The first 0 days is $0, the next 0 days is $0, and everything afterward is $50.
Here is how you would make the first day of storage FREE, and every day afterward $50.
After you have determined your storage amounts, direct your attention to the Storage Period area. This area is just to tell Tracker when the reoccurring storage charge starts. Keep in mind that the day a vehicle comes into impound, that is considered the first day. If the storage period is set to Calendar Day, then at midnight (2400) is when the storage charge would roll over into the next day. If the storage is set to 24 hours, then the storage rolls over into the next day 24 hours after it came in. If the storage is Custom then you can determine when the storage charge occurs from the Misc Charge button on that account screen (right below Rates).
The bottom left, the red box, is where Tracker determines its Mileage Charges. If your tow operation does not charge anything by the mile for this tow type then leave this section blank. Otherwise, this area functions very similarly to how the storage section is set up. It is broken down into two sections, Loaded and Unloaded. The loaded miles are just the miles your truck is carrying the job cargo/vehicle(s), and the unloaded miles are those that your truck is not carrying the job cargo/vehicle(s).
If you read the storage section of this guide, you will understand how the First, Next, and Thereafter work.
If you read the storage section of this guide, you will understand how the First, Next, and Thereafter work.
The same rules apply here and are best understood through an example.

In the above example, I have it so the first 10 miles of the unloaded mileage is free, and then it starts charging $5 per mile. The loaded mileage simply has $5 every mile. This is because Tracker reads the above Loaded mileage as the first 0 miles are charged $0, the next 0 miles are $0, and everything afterward is $5. Both Loaded and Unloaded are very customizable. Many tow operations will charge significantly more mileage for Heavy-duty jobs.
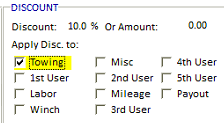
The bottom right section, the orange box, determines reoccurring Discount information. Often a discount is on a case-by-case basis, however, you do have the option to make a discount automatically occur for a given tow type for an account. Simply determine if the discount is either a percentage or a flat amount, and then choose which charge line this discount affects. In the below picture I have a 10% discount on all towing charges for this tow type.
The bottom right section, the orange box, determines reoccurring Discount information. Often a discount is on a case-by-case basis, however, you do have the option to make a discount automatically occur for a given tow type for an account. Simply determine if the discount is either a percentage or a flat amount, and then choose which charge line this discount affects. In the below picture I have a 10% discount on all towing charges for this tow type.
After you have filled out every field for the Rate you are creating, be sure to click Save.
If you were following along, here is my full example rate. Be aware, that I would consider this rate that I created for this guide to be over the top for a simple Light Duty (LD) tow.

What are Master Rates?
Now at the very top right of the Account Rate window, you may have noticed a drop-down called Master Rates, and why I haven't mentioned it until now. Put simply, Master Rates are just templates that you can create so you can apply them to multiple accounts without needing to type in all tow type rate information for every single account your tow operation oversees.
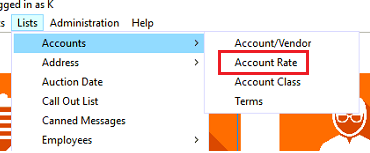
Master Rates can be created and edited from their own menu. From the Tracker main menu screen, go to Lists -> Accounts -> Account Rate.
From this list, you can add on a new Master Rate, or edit an existing one (double click on the name from within the list). These Master Rates, also called Rate Templates, can be applied to any account that shares the same charge line information. In the below example we have a Heavy Duty (HD) rate. We can fill in the general information as we would with any Rate screen. Be sure to click Save.

Once when we have this template created we can go back to any account on our account list and select "Heavy Duty" from the Master Rate dropdown. Doing so will populate this account with the same information that we see in the above picture, taking it as its own Heavy Rate data.
